
Having an editor for your book is critical. If you spend money for only one publishing-related item, editing is my recommendation. However, you can make your editor’s task easier and keep your editing expenditure down by doing an effective job of editing and proofreading your own work. Here are some of my favorite editing and proofreading tips and tricks—and they work for blogs as well as books!
Get out the red pen
I spend much of my writing time on my laptop, but when it comes to editing and proofreading, I print out my document and get out a red, purple, or green pen (gotta match the ink to the mood). Many writers find that having a tangible document makes them more effective editors.
Change fonts
When editing and proofreading, it helps to have “fresh eyes.” One simple way to see your document fresh is to change the font and font size. If you usually work in 11-point Palatino Linotype, change to 12-point Georgia. Simply select all the text (with your mouse or Control+A) and change the font manually.
Or, if you use Word’s Styles function, the style “Normal” is most likely applied to the majority of the text. Right-click on the Normal style, select Modify, choose a different font/size, save, and the changes will be applied to all the Normal text in the document. (Additional reading: How to Use Styles.) Google Docs has comparable functionality.
Use the built-in checker
Spellcheck and grammar check have become standard in almost every tool that involves writing. If you’ve got Word set to check as you type, potential misspellings typically show as red squiggly underlines and grammar issues as blue double underlines so you can correct them as you go.
You can also run the checker manually. On the Review tab, you’ll find the Spelling & Grammar button or Check Document button (depending on your version of Word). When you run the check, the Editor (at right of the page) flags potential issues. Fair warning: Exercise caution in accepting suggestions; they are not always correct, though they have been getting better as the technology improves. (More on the Word Editor settings.)
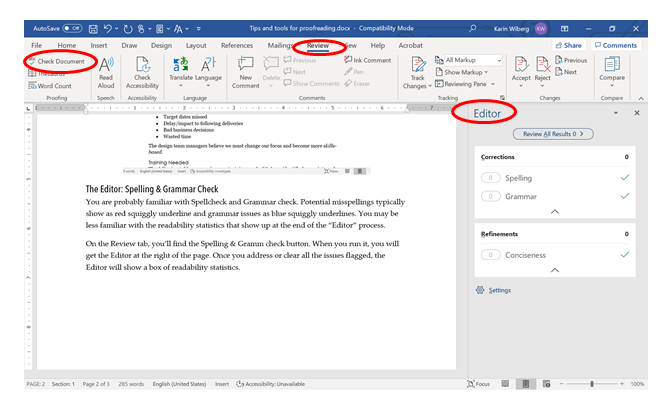
Once you address or clear all the issues flagged, the Editor displays a box of readability statistics. These can be great indicators of things that make your prose difficult to understand, such as sentences that are too long, paragraphs that are too long, and passive language.
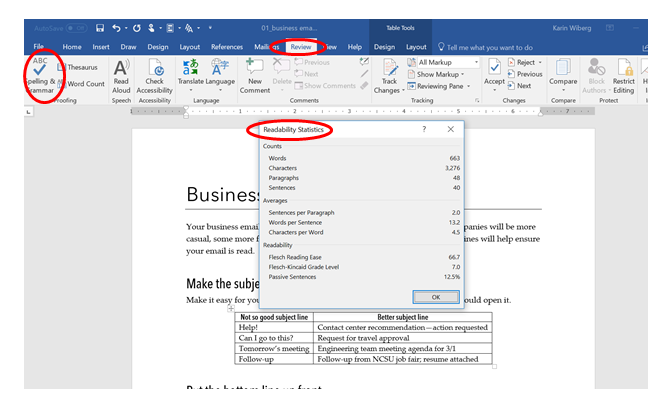
One thing I like to monitor is the Flesch-Kincaid Grade Level. In the example above, it indicates the document is understandable by someone at a 7th-grade reading level. For most documents, aim for no higher than an 8th-grade level. But, as always, know your audience; some documents require more complexity.
Google Docs has spelling and grammar functionality similar to Word’s. For readability statistics, it appears a third-party app is required.
Read aloud
One of the best ways to find mistakes, clunky phrases, and language that doesn’t sound like you is to read your writing aloud. Pretend you’re creating an audiobook. Can you read your text smoothly and naturally for your listeners, or do you stumble? Anyplace you stumble should be checked for correctness and flow.
Listen to your words
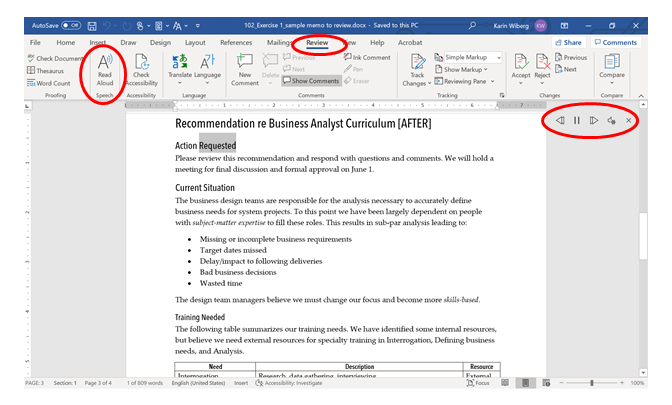
When your eyes have looked at a document for too long, they can no longer see the mistakes. Even if you read aloud, your eyes may trick you into making corrections that are not actually on the page. However, your ears can often hear the problems. If you have someone available to read your work aloud to you, awesome. If not, use my new favorite piece of technology—Word’s Read Aloud function.
From the Review tab, choose the Read Aloud function. A control panel will show at right. Use it as you would any other playback device. Hear a problem? Pause and fix it.
Note: If you like to use keyboard hotkeys (such as Control+left/right arrow) to move around your document, some of that functionality does not work while the Read Aloud function is on.
To read aloud in Google Docs, it appears an extension is needed and screen reader support must be turned on in the accessibility settings. I tried this approach and found it to be quite cumbersome, but I don’t use Google Docs regularly, so maybe you’ll find a more efficient method.
Use other online checking tools
There are many other editorial tools that can help flag potential issues in your writing.
Grammarly is one of the better-known tools. It can be used online (upload your text), or it can be integrated into your browser and word processor. The basic free version gives you limited feedback and often indicates there are issues but doesn’t tell you what they are until you have a paid subscription. Fair warning: In my experience, as with Word, Grammarly frequently makes suggestions that are incorrect. Never default to accepting all suggestions.
If you are focused on improving readability as well as having correct spelling and grammar, try Readable. Readable flags different types of issues, features multiple readability scores, and gives your writing a letter grade.
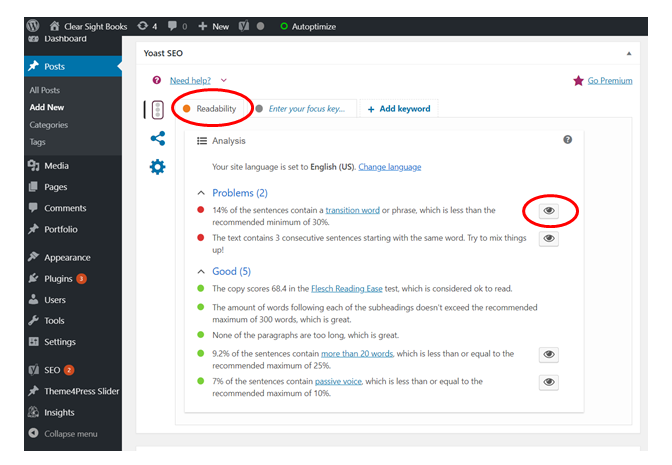
My go-to tool for improving readability in short pieces is Yoast. If you have a WordPress website, you likely use Yoast to help with SEO. When you are editing a post or a page, Yoast provides an SEO score using a green-yellow-red stoplight; it also offers a readability score using the same scale. The goal of course is green. Yoast checks multiple issues, and the “eyeballs” at right let you highlight the flagged items in the text. As you make changes, the readability score changes.
Know your own writing patterns
Finally, we all have our own writing tics—pet words, overused punctuation, words we regularly confuse (effect/affect for me!), squishy words (really, very, kind of). Even if the tics aren’t technically errors, they can cause distractions for your readers, which makes it harder to get your message to them.
Keep a running list of your own writing tics. Go through it methodically: search for each item in your document; for each instance, assess whether you can improve it. You’d be surprised at how much these seemingly small changes can strengthen the vibrancy of your words.
Do I use my own proofreading tips?
Which of these proofreading tips and tricks did I use while writing this article? First, I printed a draft and scribbled all over it (red). After making corrections and adjustments, I used the Read Aloud function—and, yes, I caught several problems. Then I copied everything into a WordPress post so I could check SEO and readability (yellow and green, respectively, on the first try). Last of all (and this might be my very best proofreading tip), I sent my document to my editor!
Looking for an editor? I am best suited for content editing and substantive editing rather than the final stages of proofreading. I’m always happy to talk though, and if I’m not the right fit for your project, I’ll try to suggest someone who is. Get in touch at karin@clearsightbooks.com or 919.609.2817.