 You start with a writing plan—maybe it’s a mind map, maybe a detailed point-by-point outline, maybe just five key points and a few jotted subpoints. It’s your choice, depending on whether you’re a pantser or a plotter, whether you’re doing self-contained or emergent writing.
Now you start writing. As the pages grow (because you are super-committed to hitting your daily word count), it becomes harder and harder to tell where you are. Even though you bold (or ALLCAP or underline) chapter and section headings, it all seems to mush together.
It’s time for your secret weapon: the Microsoft Word Automatic Table of Contents, aka the TOC.
Huh? Table of contents? Can I please just finish writing first?
When is a table of contents not a table of contents?
OK, here’s where a TOC is not really a TOC: when it’s an organizational tool. If you use it correctly, a TOC will automatically give you a visual for keeping your structure on track. AND it allows you to nimbly jump around within your document (no matter how long it gets).
Let’s go over the basics of how to set up and use a TOC, and then YOU get to go have fun!
(Note: I use Office 2016 on a PC; if you use a Mac or a different version of Word, the specifics may be slightly different. If you use Open Office or a similar tool, the same functionality probably exists; you might have to poke around to find it.)
Step 1: Use styles
For the automatic TOC to work, you must use the Styles function. Rather than manually formatting your headings, subheadings, and text, use the styles already built into Word.
Under the Home tab, you will see the Styles gallery, a box that looks something like this:

In this case, the active style is Normal, as indicated by the gray box around it. Just as a reference, the Normal style here is Calibri 11-point black; the Heading 1 style is Calibri Light 18-pt dark blue.
If you click on the dropdown arrow at right, you get even more styles:
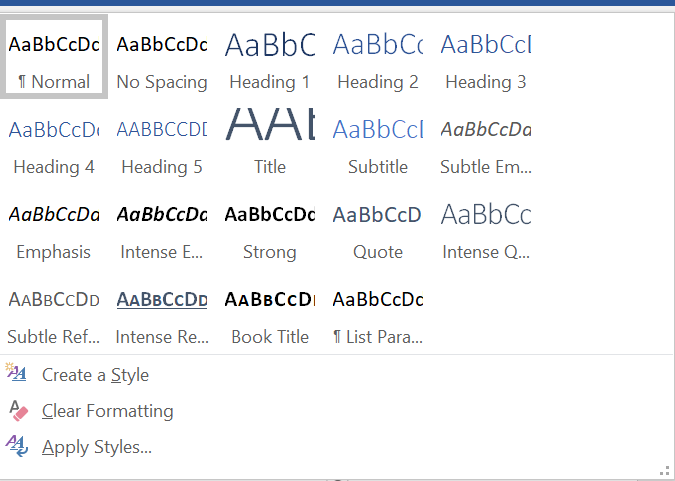
By default, when you start typing in Word, the Normal style is applied. That’s fine for your text. We’re going to apply other styles to the headings.
NOTE: Don’t worry about the specific format of the styles right now. This approach is for organizational purposes only, not for formatting and publication. (Tip: Once you apply a style to text, you can change the specific attributes for that style; the changes will be applied to all text with that style throughout your document. This is useful for when you are ready to publish.)
Applying styles
To apply styles:
- Select the text you want to apply the style to. (Tip: If you are applying a style to an entire paragraph, just click somewhere in the paragraph.)
- Click on the style you want (for example, Heading 1) in the Styles gallery, or choose it from the dropdown menu if needed.
That’s it. The formatting will automatically be applied. Need to change it? Select the text and choose a different style.
Styles I use
For early drafts I create a separate document for each chapter and apply the following styles:
- Chapter title=Title
- Top-level heading=Heading 1
- Next-level heading=Heading 2
- Next-level subheading=Heading 3
While it’s possible to keep going (Heading 4, 5, 6), three to four levels is about as deep as I usually go, because that’s about as far as a reader’s brain can go. It gets confusing if you layer your content any further.
Step 2: Create the table of contents
As you apply styles, Word automatically applies that fancy formatting to your text, but it also inserts hidden codes around it. The codes are what make it possible to automatically create a TOC. (These are basically the same as the H1, H2, and H3 codes you use on your website or blog posts.)
Inserting the TOC
To insert an automatic table of contents:
- Place your cursor wherever you would like the TOC to appear. I usually put it right after the chapter title.
- From the References tab, click on the Table of Contents button. You will see several options. For this purpose, just choose Automatic Table 1.
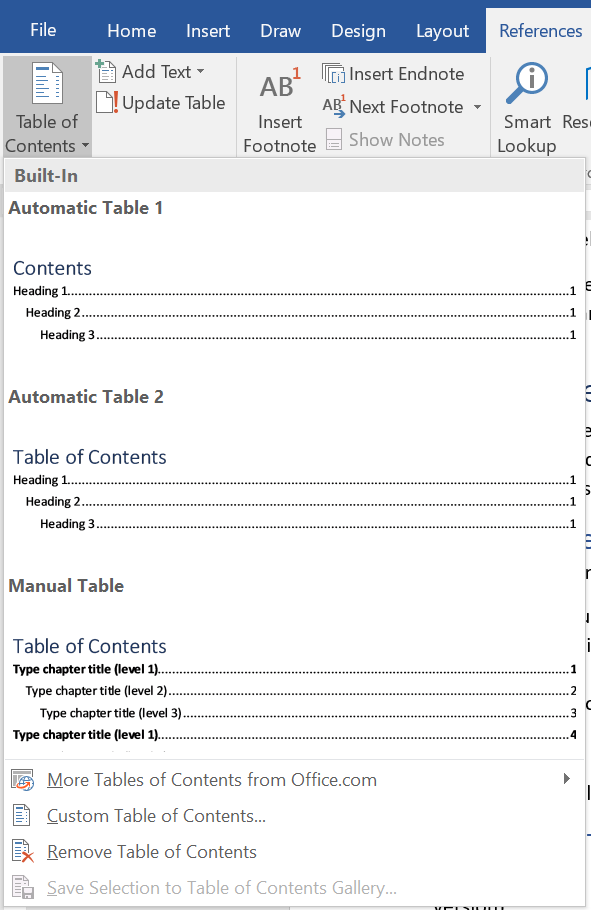
That’s it. The table of contents is inserted.
The default TOC
If you choose the default TOC, you will most likely see several things (this could vary with your Word version):
- The TOC will show three heading levels: Headings 1, 2, and 3.
- Each subsequent level will be indented about a quarter inch. This makes it look like a traditional outline, so it is easy to see the relationship between points and subpoints.
- You will likely see leaders, those rows of dots between the heading text and the page numbers.
- The page numbers will be hyperlinks. This means if you Control+Click on a page number, it will take you to that page. (Cool, yes? This enables you to jump around within the document instead of scrolling endlessly.)
Updating an existing TOC
As you keep writing and writing, you can easily update the TOC:
- Hover your mouse over the TOC. You will notice it turns gray. That means it’s a field. Right click on the field.
- You will get a dialog box. Choose Update Field.
- You may get a second dialog box asking if you want to update just the page numbers or the whole table. Choose Update entire table.
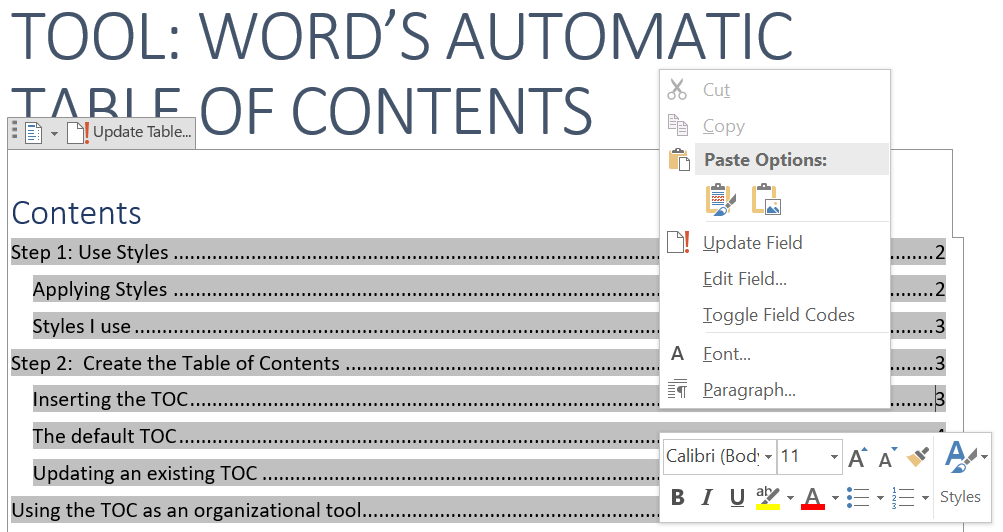
Et voilà. The table is updated with new/changed headings and correct page numbers.
NOTE: Don’t worry if your table of contents is long—a few pages even. You would not likely use this many levels in a published TOC, but they are nice to have for analyzing your structure.
Step 3: Use the TOC as an organizational tool
Now that you’ve got a table of contents, how does it help you organize?
The TOC acts as your outline, and the default indents help you view it that way, so you can start to assess whatever you’re writing to see if it is in logical order.
Things to look for
Think of headings as guideposts for your readers. Readers need to be able to scan the table of contents—or scan the headings on the page—to see where they are in the book and where they are headed.
Here are the types of issues you can find in the TOC:
- If you look at just the Heading 1 items, do they make sense? Do they accurately describe your main points and orient your reader?
- Likewise look at the Heading 2 items under each Heading 1. Do they flow? Are they parallel (if appropriate)? If the Heading 1 title is “Ways to grow your business,” are the associated Heading 2 items ways to grow your business? Or are they mixed with things you shouldn’t do to grow your business?
- Is everything at the right level of organization? If not, just change the style to the appropriate heading level and update your TOC for a fresh view.
- Look across TOCs for each chapter. Are they structured in a similar fashion (if appropriate)? Is there a type of content in some chapters that should be in other chapters as well? For example, if you have a definition section at the beginning of most chapters, should you have one in all chapters?
Once you start analyzing, you will figure out your own tips, tricks, and habits.
A simple example
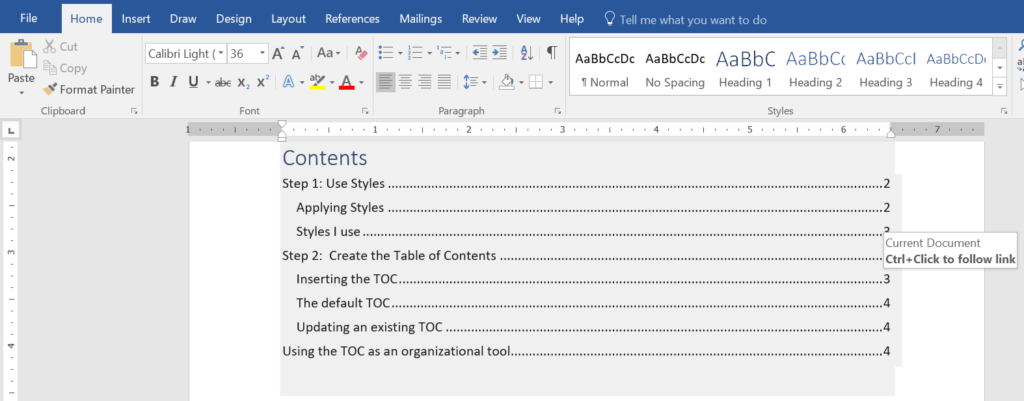
I use the automatic TOC all the time to help me test my organization and heading language. For example, here is an earlier version of the TOC from this blog post:
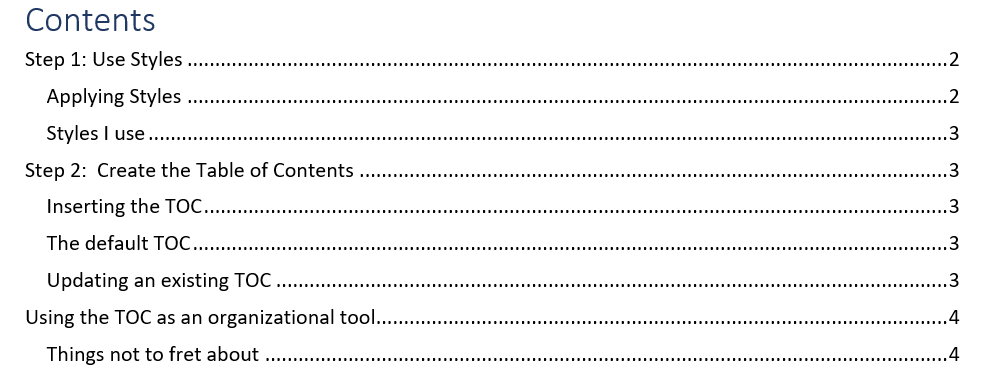
As I analyze it, here’s what I notice:
- I’ve got Step 1 and Step 2, but the third step (using the TOC) is not labeled Step 3.
- Once I’ve clearly labeled the three steps, I realize their construction is not parallel. (Step 3 is a gerund rather than command form of the verb.)
- There is a random Heading 2, “Things not to fret about,” under Step 3. As a general rule, you should have at least two subheadings; if you have only one, you don’t need it. I moved the content from under that heading into different sections of the article where it was more relevant. I also added two new subheadings to provide guidance and an example.
Here’s the revised TOC:
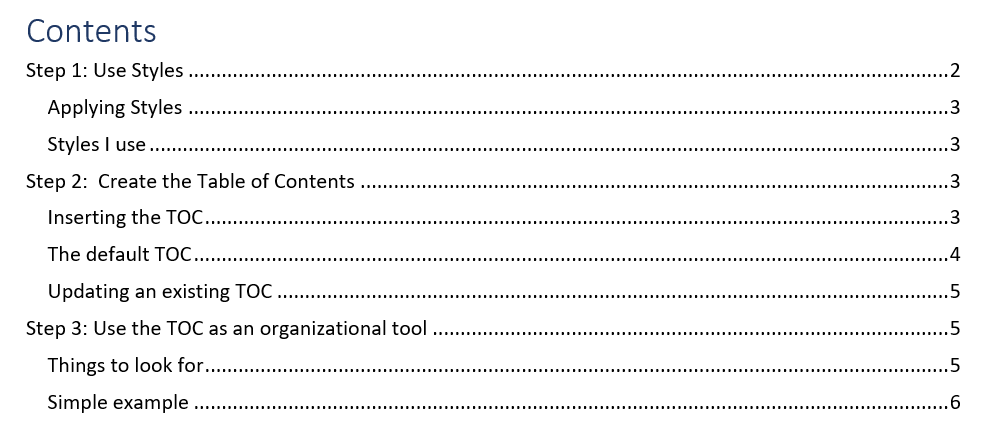
(Well, that’s the TOC until my editor gets hold of this post anyway!)
One more tip: When I draft a post in Word using Headings 1, 2, and 3 from the Styles gallery, I can copy and paste into my WordPress blog post and the formatting is already in place. Sweet timesaver!
OK, friends, you’ve got the secret weapon: the automatic table of contents. Have at it and have fun!
Still getting lost in your manuscript’s organizational structure? That’s one of the factors I look at in a Manuscript Intensive. If you need help, give me a call at 919-609-2817. I, too, am a secret weapon…